The Code Basket is a code interface in the Folio Views application software that, when active, will provide enhanced functionality for gathering and organizing classification codes so that they can be exported for use in patient record abstracting systems. Clients must ask their abstracting system vendor to make the changes necessary to allow the import of codes into their abstracting system.
The Code Basket is compatible or configured for
- MS Windows operating systems and only those versions that are compatible with Folio Views software;
- Folio Views software distributed with version 2009 ICD-10-CA/CCI and later releases of ICD-10-CA and CCI (backwards compatibility is not allowed);
- Hardware systems and specifications supported by Folio Views.
Note: The Code basket will not allow the selection of chapter, block or rubric codes. For instance, in CCI, you cannot select Block (e.g., 1.^^), Group (e.g., 1.AA.^^) or Rubric level codes (e.g., 1.AA.13.^^). In ICD-10-CA, most 3-character category codes cannot be selected; however, exceptions (e.g., B24) are permitted for those that have acceptable code validations to allow it on an abstract.
Code basket functionality
On the main Folio screen, the Code basket icon appears in the toolbar in both classifications.
In ICD-10-CA, click the Code basket to begin populating diagnosis codes. If necessary, remove any previous content that may reside in your Code basket by selecting the Empty button.
Note: v2018 of ICD10CA/CCI was used for the code basket instructions for illustration purposes.

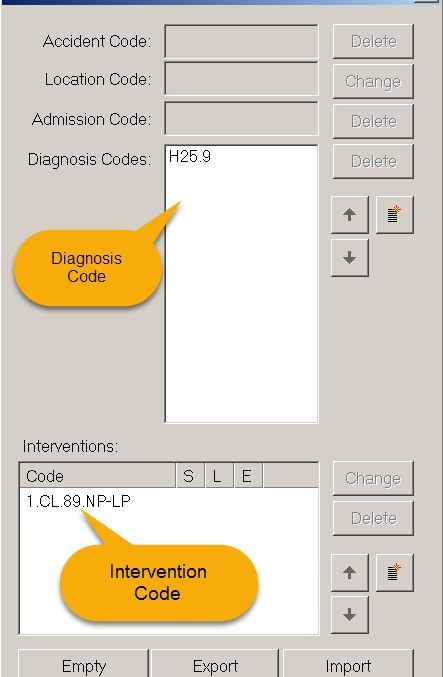
In ICD-10-CA, the Code basket window comprises 4 fields: Accident Code; Location Code; Admission Code and Diagnosis Codes.
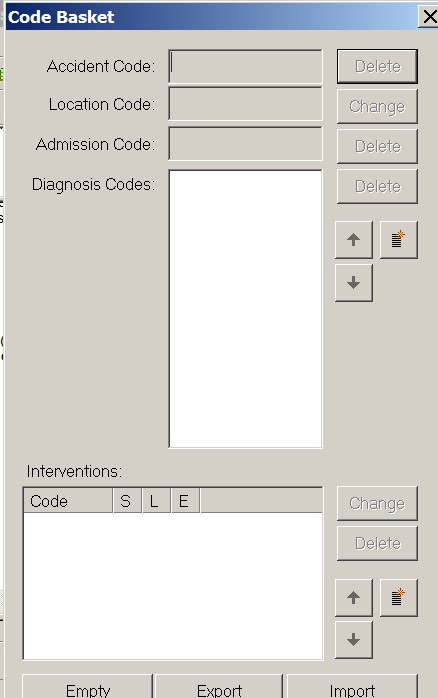
The Accident Code field accepts any external cause of injury code from Chapter XX External causes of morbidity and mortality (V01–Y98). This field is limited to 1 code only.
The Location Code field is reserved for Place of occurrence codes only (e.g., U98.0–U98.9) and is limited to 1 code.
The Admission Code field can be used to code the admitting diagnosis when it differs from the most responsible diagnosis code; it is limited to 1 code selection. Its use is determined at the provincial or facility level. Please consult your facility requirements for applicability.
The Diagnosis Codes field accepts any valid diagnosis code and can accept as many as 25 diagnosis codes.
There are 2 options available for inserting codes:
Option 1
Upon finding the appropriate ICD-10-CA codes in the Tabular list, place the cursor on the code in question and right-click to insert the code into the Code basket. In your selection, you can choose Add Accident code, Add Admission code and Add Diagnosis code. The code will then be inserted into the Code basket.

Option 2
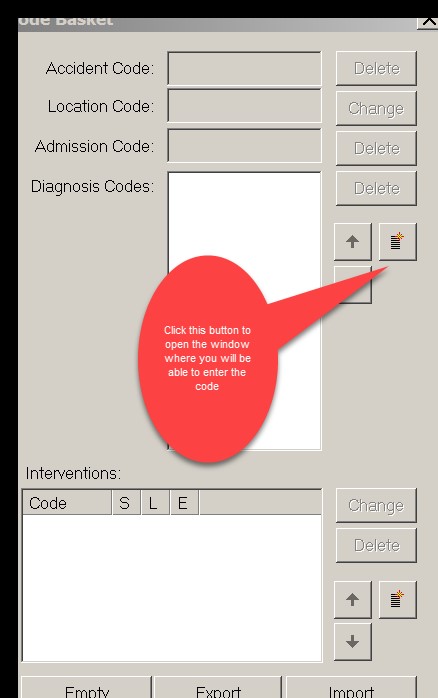
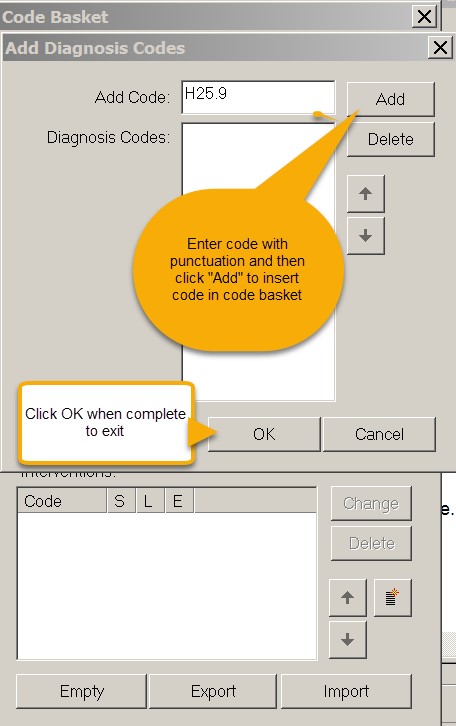
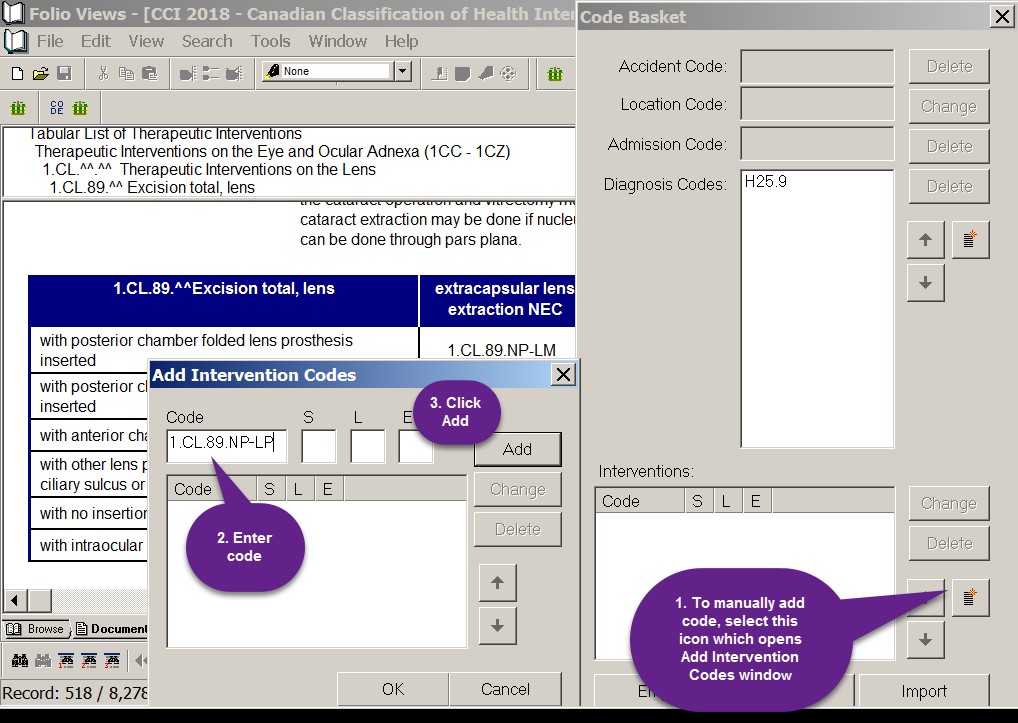
Enter the codes manually. To do this, click the Add Diagnosis Codes icon , which opens a pop-up window. In the first field entitled Add Code, enter the code you want, including the decimal point (e.g., H25.9). Then click Add to insert the code in the Diagnosis Codes field. To exit the pop-up window, click OK directly below the Diagnosis Codes field.
Note: The Code basket will monitor the selection for classification codes. If no code is found or if the cursor is not positioned correctly, an error message will be generated.
The Code basket will enable code input selection options for 1 classification at a time.
When you have entered all diagnoses codes and you want to switch from ICD-10-CA to CCI, open the CCI classification. Upon opening CCI, the Code basket may not appear right away. It will reappear when the first CCI code is added.
There are 2 options available for inserting CCI codes:
Option 1
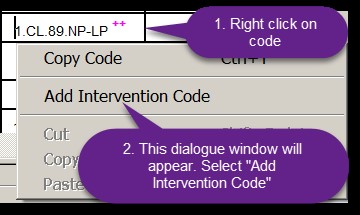
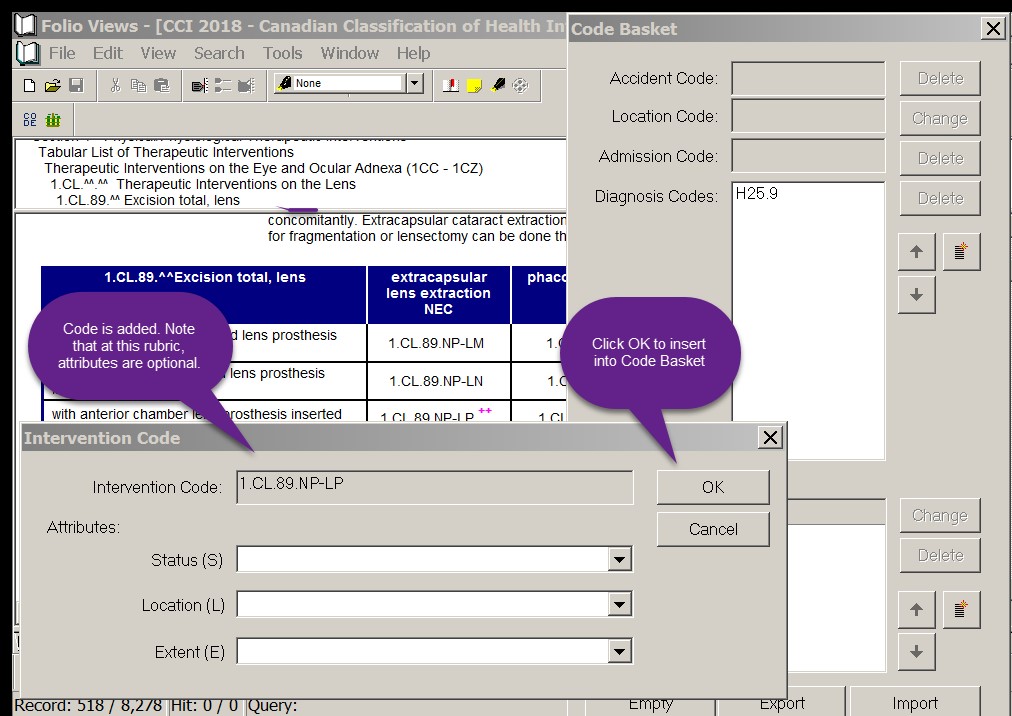
Upon finding the appropriate CCI code in the Tabular list, place the cursor on the code in question, then right-click to prompt a pop-up window to appear. Click Add Intervention Code to insert the code into the Code basket.
The code is then populated into the Intervention Code field. Click OK next to this field to insert the code into the Code basket. Notice that when selecting a CCI code, this Intervention Code pop-up window also contains drop-down fields for attribute selections that may apply. For optional attributes, there will be nothing populated in the drop-down box.
Once you have added the intervention codes, the Code basket is complete. It houses all the diagnosis and intervention codes you have selected.
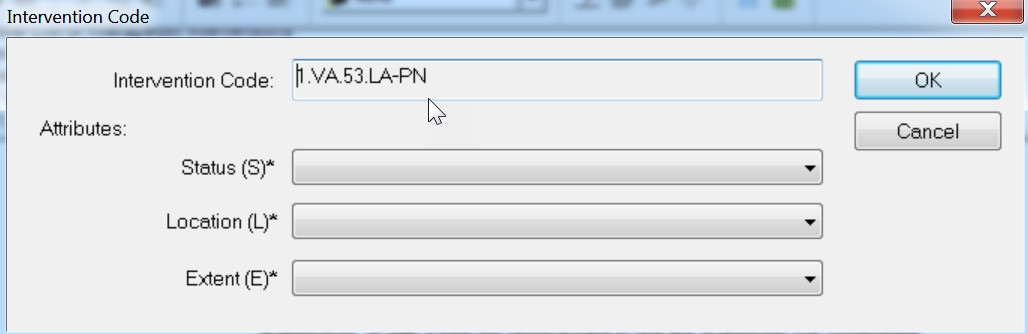
Note: When the attribute is mandatory, an asterisk will appear beside the mandatory attribute type, as follows: Status (S)*, Location (L)* and/or Extent (E)*.
For example, at code 1.VA.53.LA–PN, there is an asterisk beside each attribute type, Status (S)*, Location (L)* and Extent (E)*, meaning that a selection must be made from the drop-down box for each attribute in order to add the attribute code.
Option 2
Enter codes into the Code basket to enter the intervention code manually. Under the Interventions portion of the Code basket, click the Add Intervention Codes icon , which opens a pop-up window. In the Add Code field, enter the code with the decimal points and dash. If there are any applicable attributes, add them in this window. Once you have entered the code and any applicable attributes, click Add, located at the top right of this pop-up window. When you have completed entering all of your codes, click OK to exit.
Note: Once you are in the Code basket, codes can be edited or removed from the list; attribute field items or other qualifiers from pull-down lists, check-boxes or look-up tables can be appended; and codes can be sorted or an order of preference can be set within the list by selecting the up/down arrows.

When you have completed the selection of diagnosis and intervention codes, you can now transfer the codes from the Code basket.
Note: Before performing the Export function, you can finalize your selection by changing the file-naming and saving locations, and by validating the information — ensuring code captions and codes are complete and/or in sequence, if applicable.
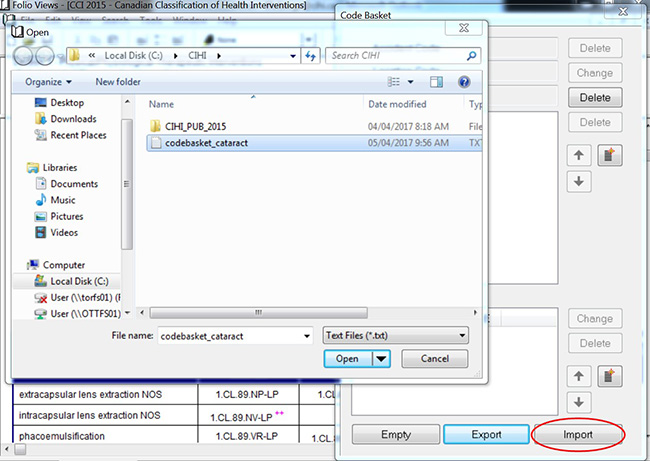
You can also save a frequently used Code basket if you like. After entering the required codes in the Code basket, click Export at the bottom middle of the Code basket window. Name the file and save it to a directory of your choice.

To retrieve a saved Code basket, click Import in the Code basket window. A dialogue box will appear for you to search for the Code basket. Double-click the desired basket and the codes will appear in the Code basket.